Google Nexus 7 Manual
Get to know your very own Google Nexus 7 with the help of Sydney CBD Repair Team. Read the manual to get the most out of your smartphone.

Google Nexus 7 Full Specs
Know what powers the Google Nexus 7.
Read SpecsGoogle Nexus 7 Screen Repair
Got a Google Nexus 7 cracked screen? Don’t worry, have the lowest repair rates in Sydney with Sydney CBD Repair Centre!
Get Service






Download the PDF version of this manual here.
-
To use your tablet with mobile network data, you must first insert & activate a SIM card. If no card is installed, the message “No SIM card” appears on the tablet’s lock screen.
Only Nexus 7 (2013) LTE can accept a SIM card. Wi-Fi versions of the tablet can’t.
Warning : The SIM card ejection tool and the SIM card tray included with Nexus 7 are very small objects that represent a choking hazard. Please keep them out of reach of small children.
To insert a new SIM card
1. Turn your tablet off and place it on a flat surface with the screen facing up, with the camera at the top and the Power button on the right.
2. Tilt the right side slightly and locate the SIM card tray near the bottom and the small hole in the tray door.
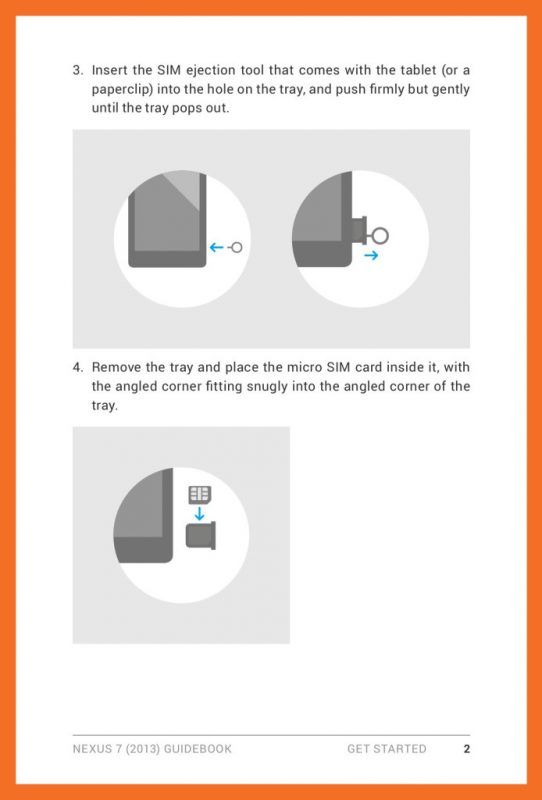
3. Insert the SIM ejection tool that comes with the tablet (or a paperclip) into the hole on the tray, and push firmly but gently until the tray pops out.
4. Remove the tray and place the micro SIM card inside it, with the angled corner fitting snugly into the angled corner of the tray.
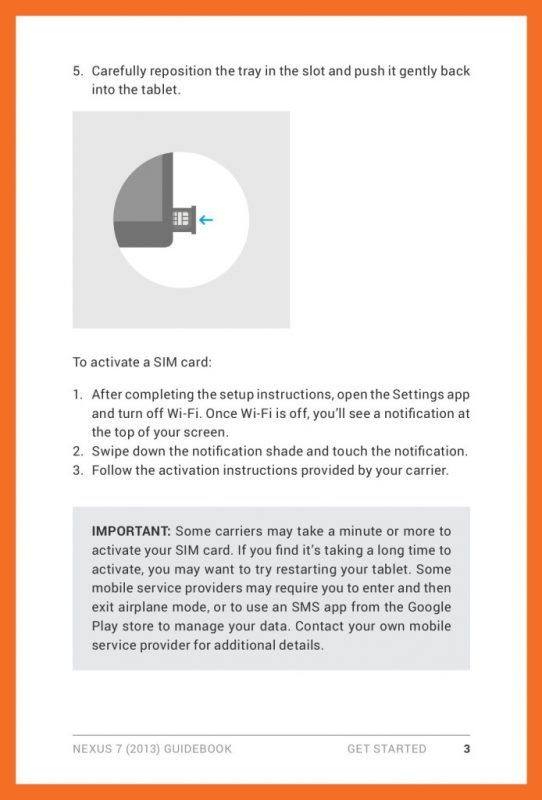
5. Carefully reposition the tray in the slot and push it gently back into the tablet.To activate a SIM card
1. After completing the setup instructions, open the Settings app and turn off Wi-Fi. Once Wi-Fi is off, you’ll see a notification at the top of your screen.
2. Swipe down the notification shade and touch the notification.
3. Follow the activation instructions provided by your carrier.IMPORTANT: Some carriers may take a minute or more to activate your SIM card. If you find it’s taking a long time to activate, you may want to try restarting your tablet. Some mobile service providers may require you to enter and then exit airplane mode, or to use an SMS app from the Google
Play store to manage your data. Contact your own mobile service provider for additional details. -
The battery may not be fully charged at first. It’s a good idea to fully charge it as soon as you can.
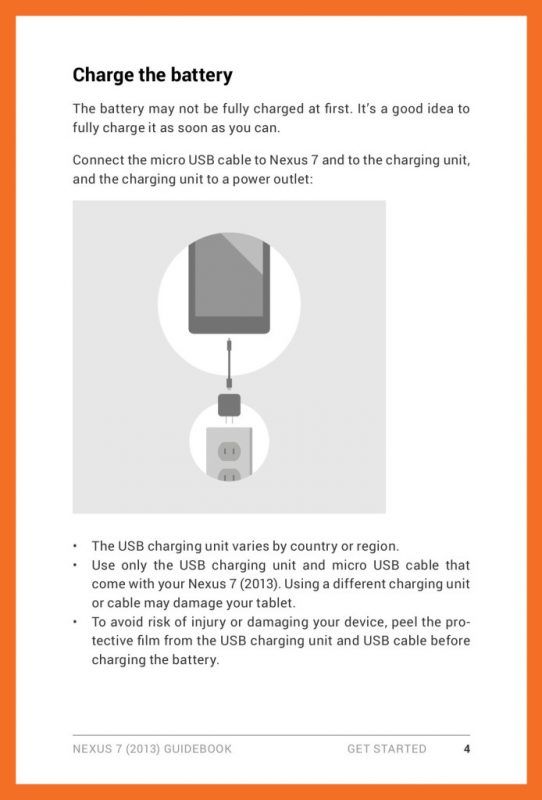
Connect the micro USB cable to Nexus 7 and to the charging unit, and the charging unit to a power outlet:
• The USB charging unit varies by country or region.
• Use only the USB charging unit and micro USB cable that come with your Nexus 7 (2013). Using a different charging unit or cable may damage your tablet.
• To avoid risk of injury or damaging your device, peel the protective film from the USB charging unit and USB cable before charging the battery.
• The input voltage range between the wall outlet and this charging unit is AC 100V–240V, and the charging unit’s output voltage is DC5.2V, 1.35A.
• Your Nexus 7 can be charged via the USB port on a computer only when Nexus 7 is in sleep mode (screen off) or turned off. Charging through the USB port will take longer than charging with the USB charging unit. -
To turn on your Nexus 7, press the Power button on the right edge near the top for a few seconds, then release it.
The first time you turn on the tablet, you’ll see a Welcome screen.
• To choose a different language, touch the menu.
• To continue, touch the Play icon and follow the instructions.IMPORTANT: You must have a Wi-Fi connection to complete
the setup process.When prompted, you can sign in with your Google Account or create one at that time. You can also choose to skip this step and create one later.
An email address that you use for any of the following counts as a Google Account:
• Gmail
• YouTube
• Google Apps
• AdWords
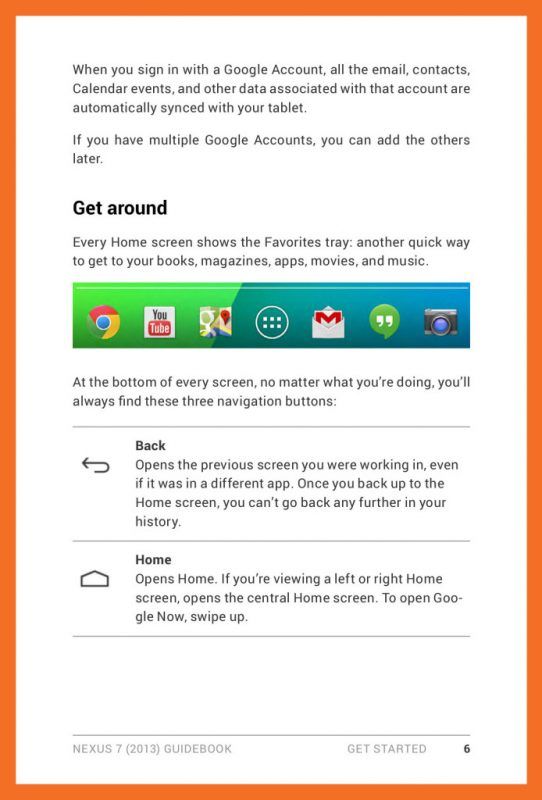
• Any other Google productWhen you sign in with a Google Account, all the email, contacts, Calendar events, and other data associated with that account are automatically synced with your tablet.
If you have multiple Google Accounts, you can add the others later.
-
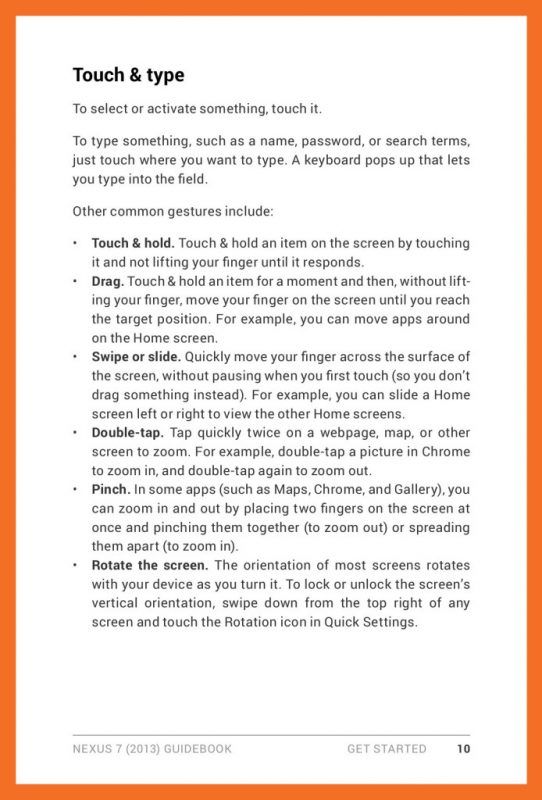
To select or activate something, touch it.
To type something, such as a name, password, or search terms, just touch where you want to type. A keyboard pops up that lets you type into the field.
Other common gestures include:
• Touch & hold. Touch & hold an item on the screen by touching it and not lifting your finger until it responds.
• Drag. Touch & hold an item for a moment and then, without lifting your finger, move your finger on the screen until you reach the target position. For example, you can move apps around on the Home screen.
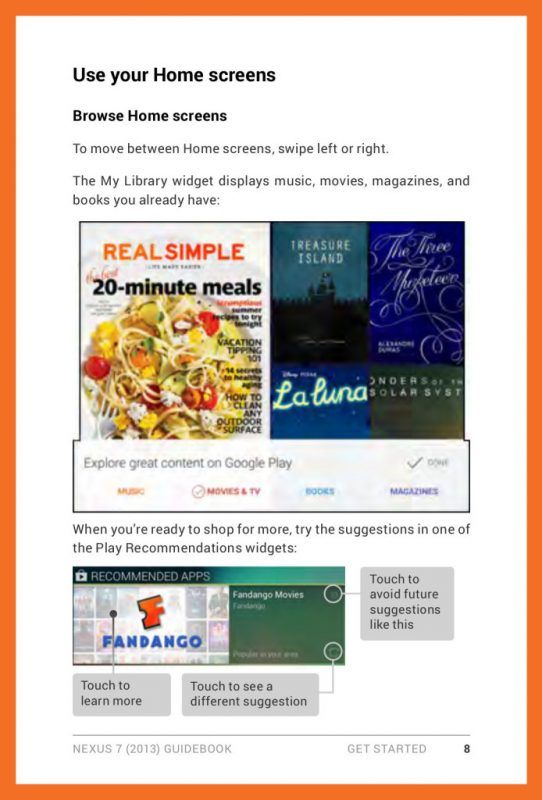
• Swipe or slide. Quickly move your finger across the surface of the screen, without pausing when you first touch (so you don’t drag something instead). For example, you can slide a Home screen left or right to view the other Home screens.
• Double-tap. Tap quickly twice on a webpage, map, or other screen to zoom. For example, double-tap a picture in Chrome to zoom in, and double-tap again to zoom out.
• Pinch. In some apps (such as Maps, Chrome, and Gallery), you can zoom in and out by placing two fingers on the screen at once and pinching them together (to zoom out) or spreading them apart (to zoom in).
• Rotate the screen. The orientation of most screens rotates with your device as you turn it. To lock or unlock the screen’s vertical orientation, swipe down from the top right of any screen and touch the Rotation icon in Quick Settings. -
To change the wallpaper that’s displayed on your Home screens:
1. Touch & hold anywhere on a Home screen that’s not occupied. A list of options appears.
2. Touch a wallpaper source:
Gallery. Choose from pictures that you’ve synced with your tablet.
Live Wallpapers. Choose from a scrolling list of animated wallpapers.
Wallpapers. Choose from thumbnails of default images, or touch a thumbnail for a larger version.
You can download additional wallpapers on Google Play.
3. To set a wallpaper, touch Set wallpaper or, for Gallery images, drag the blue dots to determine the cropping, and touch OK. -
You can easily take a screenshot on your tablet that you can save in your Gallery or share with others:
1. Make sure the image you want to capture is displayed on the screen.
2. Press the Power and Volume down buttons simultaneously. The screenshot is automatically saved in your Gallery. -
Use the Gmail app to read and write email from any mobile device or browser. To open it, touch the
Gmail icon on a Home or All Apps screen.But Gmail isn’t just about email. You can use your Gmail account to sign in to all Google apps and services, including these and many more:
• Google Now, for getting just the right information at just the right time
• Calendar
• People, for keeping track of your contacts
• Google Drive, for working with documents, spreadsheets, or drawingsWhile you’re reading a message:
• Touch the icons and menu along the top of the screen to archive, throw away, label, or perform other actions on that message.
• Swipe left or right to read the previous or next conversation.To organize your email, check the box beside a message to select it. Then use the icons and menu along the top of the screen to manage the selected messages.
To change your settings, add an account, or get help, touch the Menu icon.
No matter where you are within Gmail, you can always get back to the Inbox by touching the Gmail icon at the top of the screen. -
To open the Clock, touch the Clock icon from a Home or All Apps screen.
Set an alarm
1. Touch the Alarm Clock icon in the lower left corner of the screen.
2. Touch the Add icon to add a new alarm.Select the time you want, then touch OK. Any existing alarms will show in the main Clock screen. To turn one On or Off, slide the switch.
You can also add a label to an alarm and change the ringtone. To change these options for a single alarm, touch the arrow underneath the On/Off switch.
Set a timer
1. Touch the Timer icon in the top left corner of the screen.
2. Enter the time you want, then touch Start.When the timer is going, you can add an additional minute, pause the timer, or delete the current timer.
The timer beeps when the time is up. It keeps beeping until you touch Stop.Use the stopwatch
1. Touch the Stopwatch icon in the top right corner of the screen.
2. Touch Start to start the stopwatch.If you want to pause the stopwatch, touch Stop. You can also add laps while the stopwatch is running by touching the icon to the left of the stopwatch.
To share your results, touch the Share icon to share via Google+, Gmail, and more.
View your Clock
To view the current date and time, touch the Clock icon at the top center of the screen.
-
To manage most downloads, touch the Downloads icon on the All Apps screen. Movies and some other
content that you download don’t show up in the Downloads app.Google Play streams your purchases and rentals from Google servers while you’re playing them. They don’t occupy permanent storage space. However, you can pin (download) books, movies, and other content in order to access it offline.
In addition to downloading content from Google Play, you can download files from Gmail or other sources. Use the Downloads app to view, reopen, or delete what you download in this way.
From the Downloads app:
• Touch an item to open it.
• Touch headings for earlier downloads to view them.
• Check items you want to share. Then touch the Share icon and choose a sharing method from the list.
• Check items you want to delete. Then touch the Trash icon.
• At the bottom of the screen, touch Sort by size or Sort by date to switch back and forth.When your tablet is connected to a computer, look in the Download directory to view files available in the Downloads app. You can view and copy files from this directory.
-
To view the Google Now cards that are waiting for you at any particular time, swipe up from the bottom of your tablet, or touch Google on any Home screen.
Google Now displays cards when they’re most likely to be useful and relevant based on the current time and your current location. To expand that search and get additional ones, touch Show more
cards below the last card displayed.Swipe cards away
Swipe cards away when you don’t need them.
You’ll occasionally be asked whether a card was useful. By answering, you can help Google Now learn which cards are most useful to you and when.
Turn cards off or on
1. From the main Google Now screen, go to Menu > Settings > Google Now.
2. Locate the type of card.
3. Touch the card’s On/Off switch.Edit card settings
To learn why a card appears when it does, or to adjust your preferences for that card type, touch the Info icon. The icon turns blue, and the card expands downward.
The italicized text explains why the card has appeared at the current time or location.
In some cases, you can also adjust preferences related to that card (such as Fahrenheit or Celsius for the Weather card). Some cards also let you answer questions that help Google Now finetune
its performance.To hide this information, touch the Info icon again.
Some cards rely on details you specify about your home and work addresses, the sports team or stocks you’re following, and so on. To edit such details, go to Menu > Settings > My stuff.
Adjust notifications
When cards appear, you’ll receive a notification. You can touch the notification to open the card, or swipe to dismiss it.
For high-priority card notifications, you can set a ringtone or turn Vibrate on or off. You can also turn notifications for specific types of cards off completely. To adjust notifications:
• Touch Menu > Settings > Notifications
Use the Google Now widget
The Google Now widget displays a summary of your current Google Now cards, either on a Home screen or on the lock screen. Touch the widget anywhere to see the details in Google Now.
To add a Google Now widget:
1. To the lock screen: Touch the Add icon and follow the instructions.
2. To the Home screen: Touch the All Apps icon and swipe left until you find the widget. Then touch & hold the widget to activate a Home screen, and drag the widget to the location
you want. -
You can turn Google Now on or off from within the Google Search app:
1. Swipe up from the bottom of any screen, or touch Google or the Google icon on a Home screen.
2. Touch Menu > Settings. You may need to lower the keyboard to see the Menu icon.Turn on Google Now from the Settings screen:
1. Touch Google Now.
2. In the screen that appears, touch Yes, I’m in.Turn off Google Now from the Settings screen:
1. Touch Google Now.
2. Slide the On/Off switch to Off.
3. In the dialog that appears, decide whether you also want to turn off Location History. If so, check Also turn off Location history. Selecting this option may affect the way other Google products work.
4. Touch Turn off.Turning off Google Now stops the display of cards and returns any card settings you may have changed to their initial state. Turning off Location History doesn’t delete existing history or turn off Location Reporting.
-
This section describes how to set your home and work addresses and manage other location-related features used by Google Now.
Define home & work
As you use Google Now, you may be asked to confirm your home or work address to get commute traffic information, travel help, and more. You can change these addresses in several other ways:
• When a Traffic card appears for home or work, touch the Info icon.
• On the main Google Now screen, go to Menu > Settings > My stuff > Places, then edit Home or Work.
• Visit maps.google.com from a browser and open My Places.
• Visit Location History dashboard from a browser, click Change next to Time at Work or Time at Home, edit the address, and click Save.Turn off Location Reporting & History
To turn off both Location Reporting and Location History for your tablet:
1. Open Google Settings from the All Apps screen.
2. To turn off Location Reporting, touch Location > Location Reporting, then slide the switch to OFF.
3. To turn off Location History, touch Location > Location History, then slide the switch to OFF.You can turn off and delete your location history and still use Google Now, but certain kinds of information, such as commute traffic, may be limited or won’t show up at all.
Delete Location History details
Even if you turn off both Location Reporting and Location History, your previously recorded history is still available to Google services such as Google Now.
To delete Location History using Google Settings, follow these steps:
1. Open Google Settings from your device’s apps menu.
2. Touch Location > Location History.
3. Touch Delete Location History at the bottom of the screen.To delete Location History details, follow these steps from a web browser:
1. Open a web browser and make sure you’re signed in with the account whose Location History you want to manage.
2. Visit Location History.
A page appears that allows you to view your Location History for any date.
3. To delete all your recorded Location History, click Delete all history.
Alternatively, from this screen you can delete a portion of your Location History starting from a date you choose in the calendar.
4. Click OK. -
You can speak into your Android phone or tablet to search, get directions, send messages, and perform other common tasks. To initiate an action or a search using your voice, touch the Microphone
icon on the Home screen or in the Google Search app.If your device is running Android 4.1 or later, you don’t have to touch the microphone — just open the Google Search app and say “Google.”
IMPORTANT: To detect when you say “Google” to launch Voice Search or Voice Actions, Google analyzes sound picked up by your tablet’s microphone in intervals of a few seconds or less. The sound is immediately discarded after analysis and is not stored on the device or sent to Google.
Turn hotword detection on or off
The ability to trigger a search or action by saying “Google” is called hotword detection. To turn it off or on, open the Google Search app and touch Menu > Settings > Voice > Hotword detection.
Voice Search
After you touch the Microphone icon or say “Google,” Google listens as you speak and initiates the search or action you describe. If Voice Search doesn’t understand you, it lists a set of possible meanings. Just touch the one you want.
If you ask your question to Google, the answer can be spoken to you. The answer can be a fact, weather condition, stock price, flight status, sports score, currency conversion, mathematical calculation, and more. Some examples include:
• Weather: What’s the weather like tomorrow morning?
• Locations: Where’s the nearest pharmacy?
• Flight status: When does United Airlines flight 900 depart?
• Time: What time is it in London?
• Events: When is sunset?
• Math: What is the square root of 2209?
• Translation: How do you say cucumber in Spanish?
• Sports: When is the Red Sox game?
• Finance: How is the S&P 500 doing today?
• Trivia: How tall is the tallest building in the world?
• Conversions: How many dollars is 2600 rupees?
• Images: Show me pictures of the Golden Gate Bridge
Spoken answers are supported for English only at this time. This feature is turned on by default for Voice Search.Voice Actions
Note: Voice Actions are supported only in English, French, German, Spanish, and Italian.
You can use Voice Actions to perform common tasks, such as sending an email or opening an app.
After touching the Microphone icon or saying “Google,” speak the Voice Action you want to use. Or say “help” to see examples of the kinds of things you can tell Google to do for you.Examples include:
• “Set alarm for 8:30 a.m.”
• “Send email to Marcus Foster. Subject: Coming tonight? Message: Hope to see you later.”
• “Navigate to Mike’s Bikes in Palo Alto.”


